EasyWeds User Guide
About EasyWeds
EasyWeds is a desktop app designed for freelance wedding planners juggling multiple weddings. You can use EasyWeds to streamline planning by centralising vendor and client information and keeping every wedding detail organised. If you are adept at typing, EasyWeds empowers you to access and update your planning data swiftly.
Here are EasyWeds' main features:
Enhanced Contact Management
Comprehensive Wedding Management
Table of Contents
- Quick start
- Terminology
- Layout
- Features
- FAQ
- Known issues
- Command summary
Quick Start
Ensure you have Java
17or above installed in your computer.
Choose the installation package depending on your device: Mac, Windows or LinuxTip: Refer to this Tutorial for help with installing Java.
Download the latest
.jarfile from here.Copy the file to the folder you want to use as the home folder for your EasyWeds.
Open a command terminal,
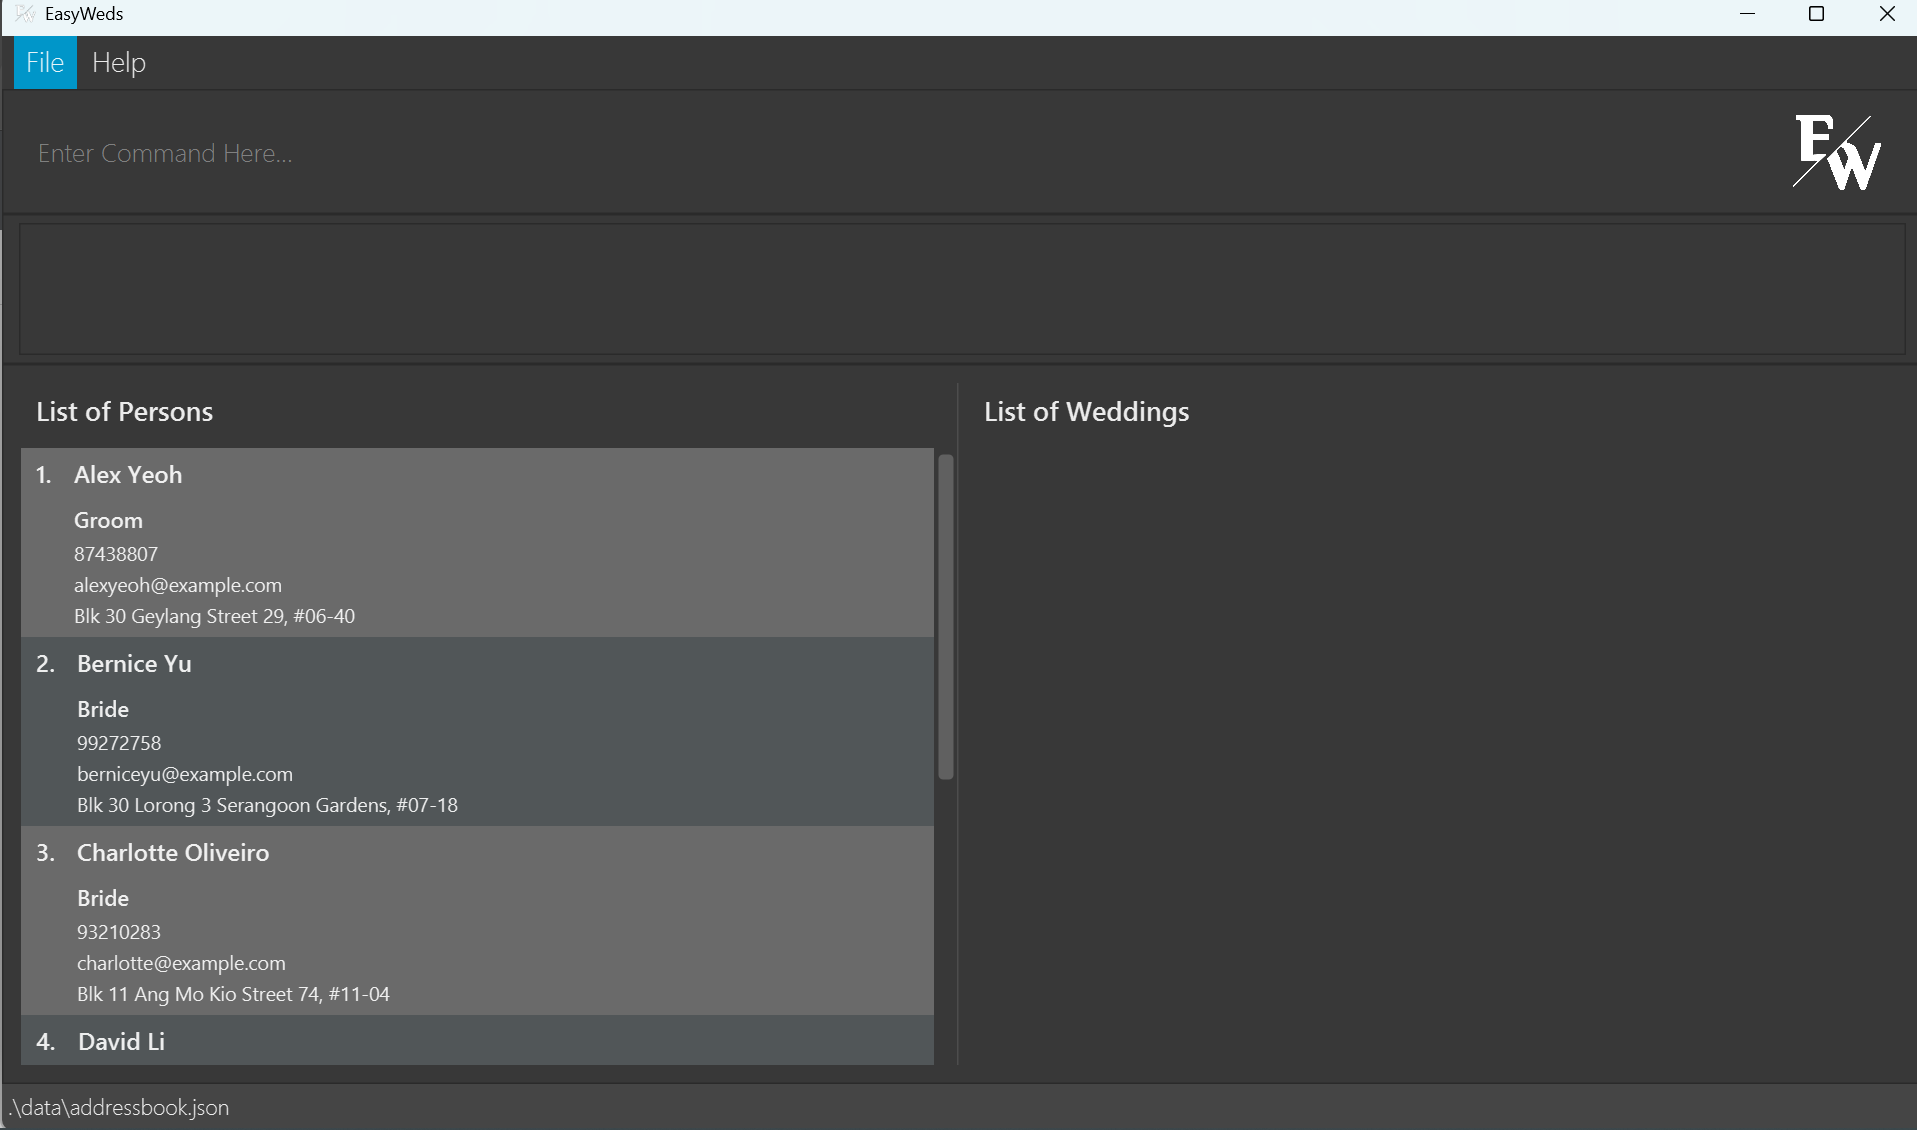
cdinto the folder you put the jar file in, and use thejava -jar easyweds.jarcommand to run the application.A Graphic User Interface (GUI) similar to the screenshot below should appear in a few seconds. Note how the app contains some sample data.
Type the command in the command box and press Enter to execute it. e.g. typing
helpand pressing Enter will open the help window.
Some example commands you can try:list: Lists all persons and wedding events.add n/John Doe p/98765432 e/johnd@example.com a/John street, block 123, #01-01 r/Photographer: Adds a contact namedJohn Doeto the contact book in EasyWeds.delete 3: Deletes the 3rd contact shown in the current list.clear: Deletes entire contact book (both persons and wedding events).exit: Exits the app.
Refer to the Features below for details of each command.
Tip: Refer to FAQ for help on setting up.
Terminology
In this guide, the following terms are used:
- Contact(s) and Person(s): These terms are used interchangeably and refer to the individuals (vendors & clients) stored in EasyWeds.
- Contact book: Refers to the list of contacts and weddings in EasyWeds.
- JSON: A data format used to store information regarding the contacts and weddings for EasyWeds.
- Graphic User Interface: A graphic user interface (GUI) is a visual way for users to interact with a software application, using elements such as buttons, windows, icons, and menus.
- Command Line Interface: A command line interface (CLI) is a text-based interface that allows users to interact with a program by typing commands into a terminal or console.
Layout
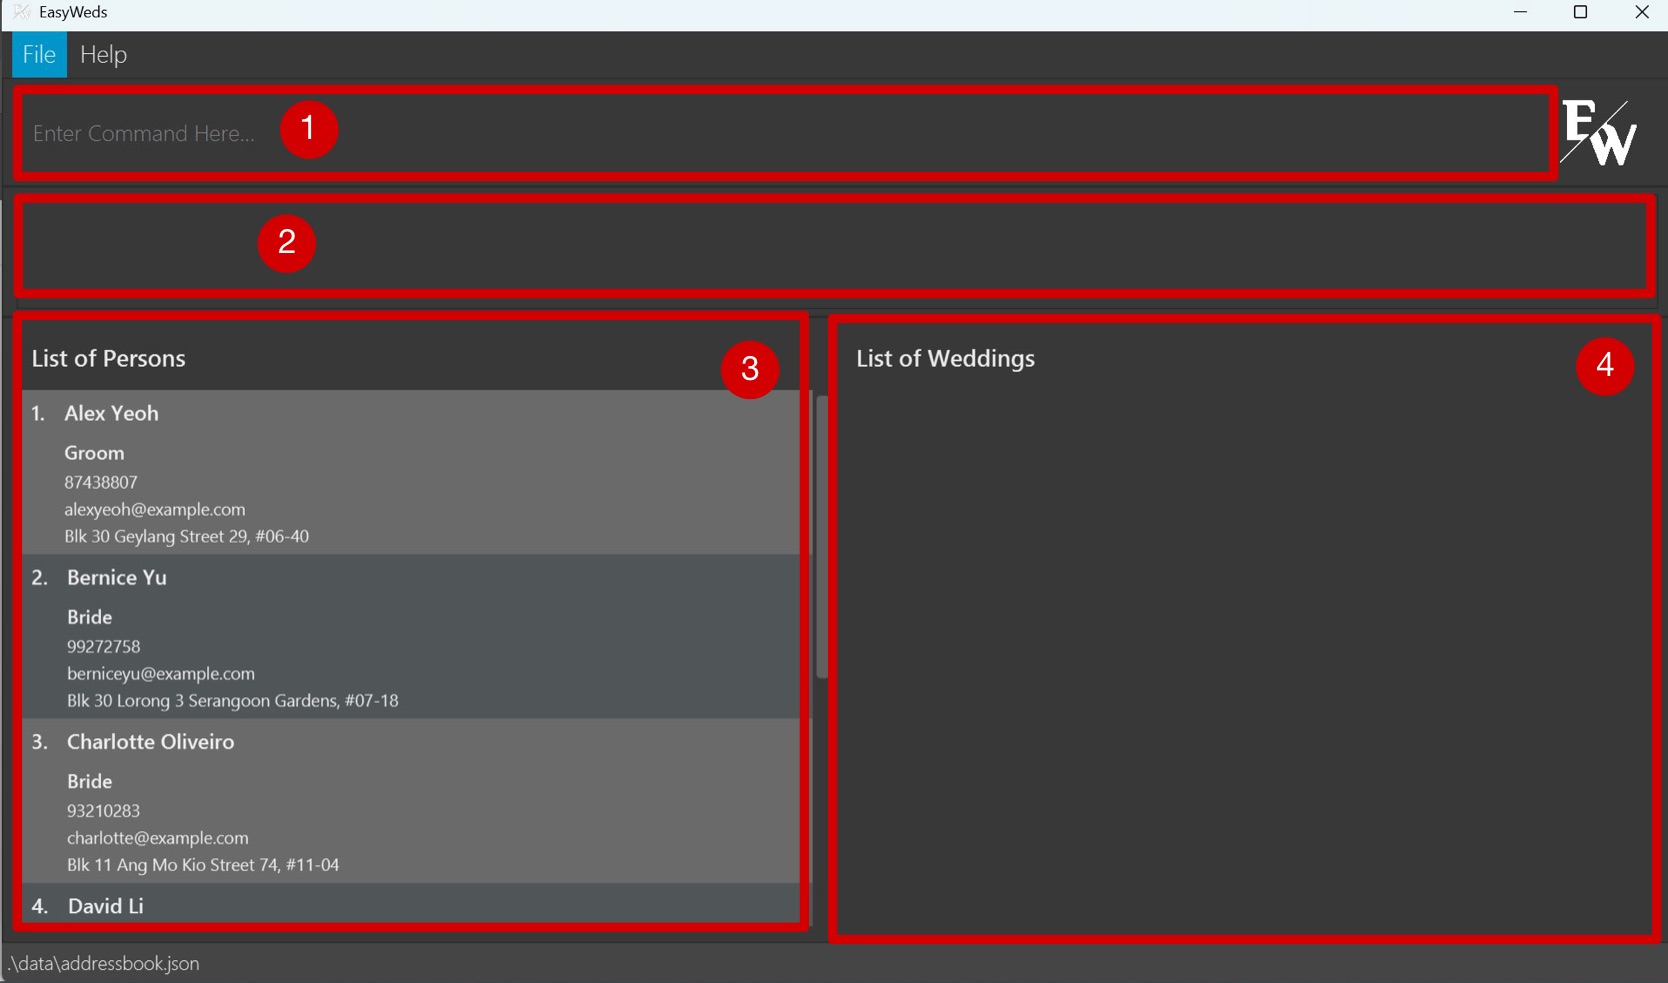
When you launch EasyWeds, EasyWeds appears on your screen as a Graphical User Interface, or GUI. Let’s look at the layout of the different components of EasyWeds.
EasyWed’s GUI consists of a single main window, as well as the Help Window. The main window consists of four components:
- Command Input
- Output Box
- List of Persons
- List of Weddings
The following picture of the main window shows the four components, numbered accordingly:
Besides the main window, EasyWeds also has the Help Window. It is not part of the main GUI and is only shown after a Help Command is run.
Features
Notes about the command format:
Press 'TAB' to auto-complete the command you are typing in the command box.
e.g. if you typeadand press 'TAB', it will auto-complete toaddand if you press it again it will auto-complete toaddWeddingand if you press it again it will auto-complete toaddTask.Words in
UPPER_CASEare the parameters to be supplied by the user.
e.g. inadd n/NAME,NAMEis a parameter which can be used asadd n/John Doe.Items in square brackets are optional.
e.gedit 1 n/NAME [r/ROLE]can be used asedit 1 n/John Doe r/Floristor asedit 1 n/John Doe.Parameters can be in any order.
e.g. if the command specifiesn/NAME p/PHONE_NUMBER,p/PHONE_NUMBER n/NAMEis also acceptable.Extraneous parameters for commands that do not take in parameters (such as
help,list,exitandclear) will be ignored.
e.g. if the command specifieshelp 123, it will be interpreted ashelp.If you are using a PDF version of this document, be careful when copying and pasting commands that span multiple lines as space characters surrounding line-breaks may be omitted when copied over to the application.
Getting Help
Viewing help: help
Shows a message explaining how to access the help page.
Format: help
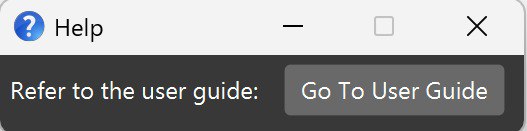
Tip: Click on the "Go To User Guide" button and the User Guide will be opened in your default browser.
Managing Contacts
Adding a Person: add
Adds a person to the contact book.
Format: add n/NAME p/PHONE_NUMBER e/EMAIL a/ADDRESS r/ROLE
- Input values must be provided for all fields.
- Your name will appear in the contact book exactly as you entered it.
- Only alphanumeric latin characters are allowed for the name field.
- A person with the same name or a similar name to an existing person in the contacts will be flagged out.
- If any of the fields' content include any of the delimiters
n/,p/,e/,a/,r/, include a\before the delimiter.- e.g. Name of a contact is "John p/Doe":
add n/John p/Doe p/98765432 ...will not be accepted due to a duplicate delimiterp/. Instead, useadd n/John \p/Doe p/98765432 ...to denote that "/p" is indeed part of the name. - This applies to all fields.
- e.g. Name of a contact is "John p/Doe":
Examples:
add n/John Doe p/87654321 e/johnd@example.com a/John street, block 123, #01-01 r/Photographer
This command adds a person named John Doe with the phone number 87654321, email johnd@example.com, address John street, block 123, #01-01, and role Photographer.
add n/Betsy Crowe r/Florist e/betsycrowe@example.com a/Blk 321 Clementi West St 1 p/12345678
This command adds a person named Betsy Crowe with the role Florist, email betsycrowe@example.com, address Blk 321 Clementi West St 1, and phone number 12345678.
Editing a Person: edit
Edits an existing person in the contact book.
Format: edit INDEX [n/NAME] [p/PHONE] [e/EMAIL] [a/ADDRESS] [r/ROLE]
- Edits the person at the specified
INDEX. The index refers to the index number shown in the displayed person list. The index must be a positive integer 1, 2, 3, … - At least one of the optional fields must be provided.
- Existing values will be updated to the input values.
- Similar to adding a person, there will be a check for duplicates for the person's name
Examples:
edit 1 p/91234567 e/johndoe@example.com
This command edits the phone number and the email address of the 1st person to be 91234567 and johndoe@example.com respectively.
edit 2 n/Betsy Crower r/photographer
This command edits the name and the role of the 2nd person to be Betsy Crower and photographer respectively.
Deleting a Person: delete
Deletes the specified person from the contact book.
Format: delete INDEX
- Deletes the person at the specified
INDEX. - The index refers to the index number shown in the displayed person list.
- The index must be a positive integer 1, 2, 3, …
Examples:
list
delete 2
This command deletes the 2nd person in the contact book.
find Betsy
delete 1
This command deletes the 1st person in the results of the find command.
Locating Persons by name or role: find
Finds persons whose names or roles contain any of the given keywords.
Format: find KEYWORD [MORE_KEYWORDS]
- The search is case-insensitive. e.g
hanswill matchHans - The order of the keywords does not matter. e.g.
Hans Bowill matchBo Hans - Either the name or the role will be searched.
- Only full words will be matched e.g.
Hanwill not matchHans - Persons matching at least one keyword will be returned (i.e.
ORsearch). e.g.Hans Bowill returnHans Gruber,Bo Yang
Examples:
find John
This command returns john and John Doe
find florist
This command returns all Persons with the role of florist
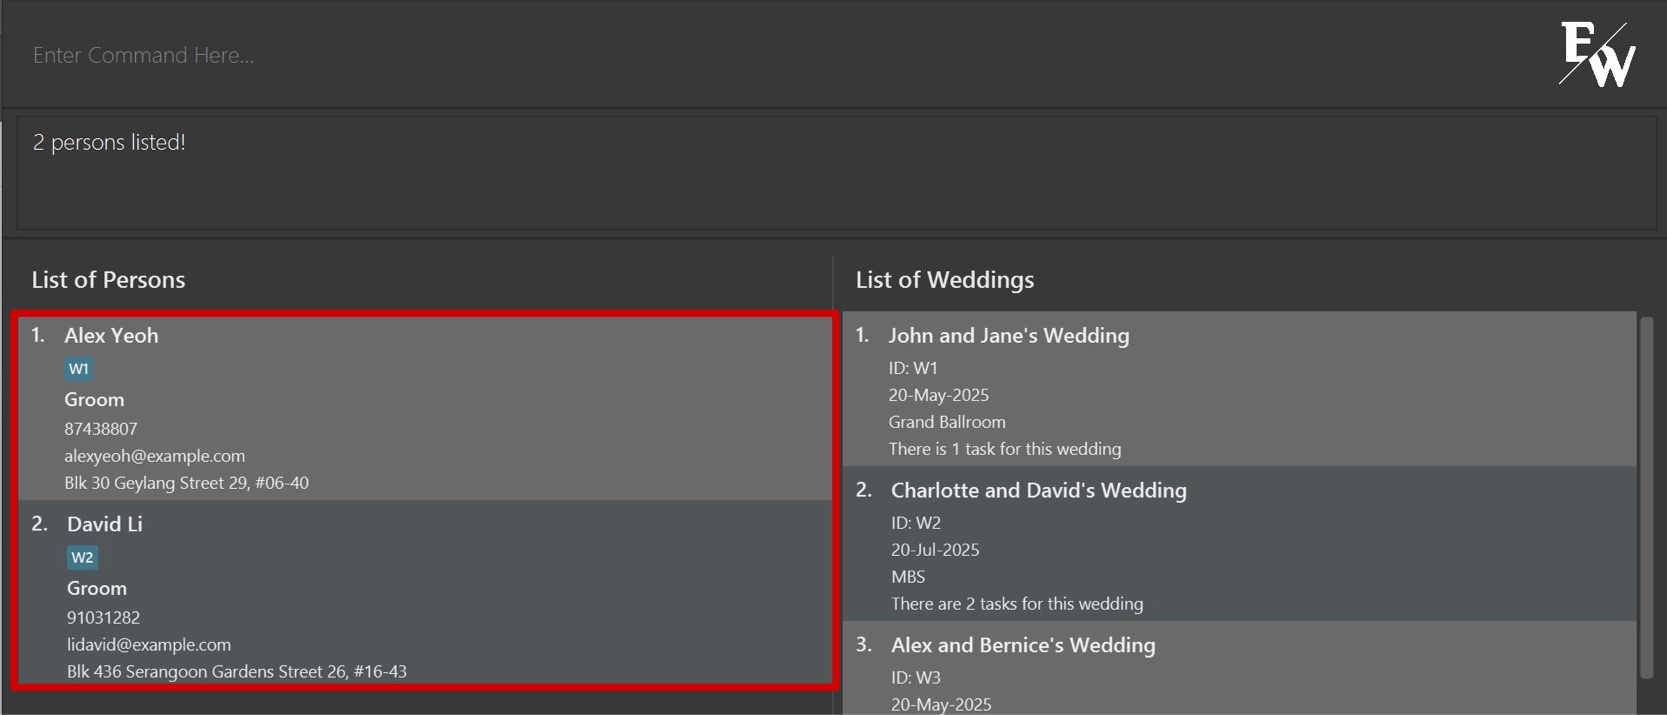
find alex david
This command returns Alex Yeoh, David Li (Refer to the image below)
Tip: In order for the 'find' by role command to be effective, ensure that you use the same noun for the same type of role (e.g. please do not call one person 'florist' and another person 'flower maker' and instead choose to give the same role to both)
Managing Wedding Events
Adding a Wedding Event: addWedding
Adds a wedding event to the contact book.
Format: addWedding n/NAME d/DATE l/LOCATION
- Input values must be provided for all fields.
- If any of the fields' content includes any of the delimiters
n/,d/,l/, include a\before the delimiter.- E.g. Name of a wedding is "John & Jane d/ Doe's Wedding":
addWedding n/John & Jane d/ Doe's Wedding d/20-May-2026 l/Marina Bay Sandswill not be accepted due to a duplicate delimiter/d. Instead, useaddWedding n/John & Jane \d/ Doe's Wedding d/20-May-2026 l/Marina Bay Sandsto denote thatd/is indeed part of the name. - This applies to all fields.
- E.g. Name of a wedding is "John & Jane d/ Doe's Wedding":
- Format of the date is flexible, e.g. "dd-MMM-yyyy", "dd/MM/yyyy", "dd.MM.yyyy", "dd MMM yyyy".
- If using
MMMformat, only the first letter should be capitalized (e.g. Jan, Feb). - Date must be a valid date and in the future.
Examples:
addWedding n/John & Jane's Wedding d/20-May-2026 l/Marina Bay Sands
This command adds a wedding event named John & Jane's Wedding on 20-May-2026 at Marina Bay Sands.
Editing a Wedding Event: editWedding
Edits an existing wedding event in the contact book.
Format: editWedding WEDDING_ID [n/NAME] [d/DATE] [l/LOCATION]
- Edits the wedding event at the specified
WEDDING_ID. - At least one of the optional fields must be provided.
- Existing values will be updated to the input values.
- Details of the wedding you want to edit cannot be the same as what is already in the wedding.
Examples:
editWedding W1 d/20-Jun-2026 l/Marina Bay Sands
This command edits the date and location of the 1st wedding event to be 20-Jun-2026 and Marina Bay Sands respectively.
editWedding W2 n/John & Jane's Wedding
This command edits the name of the 2nd wedding event to be John & Jane's Wedding.
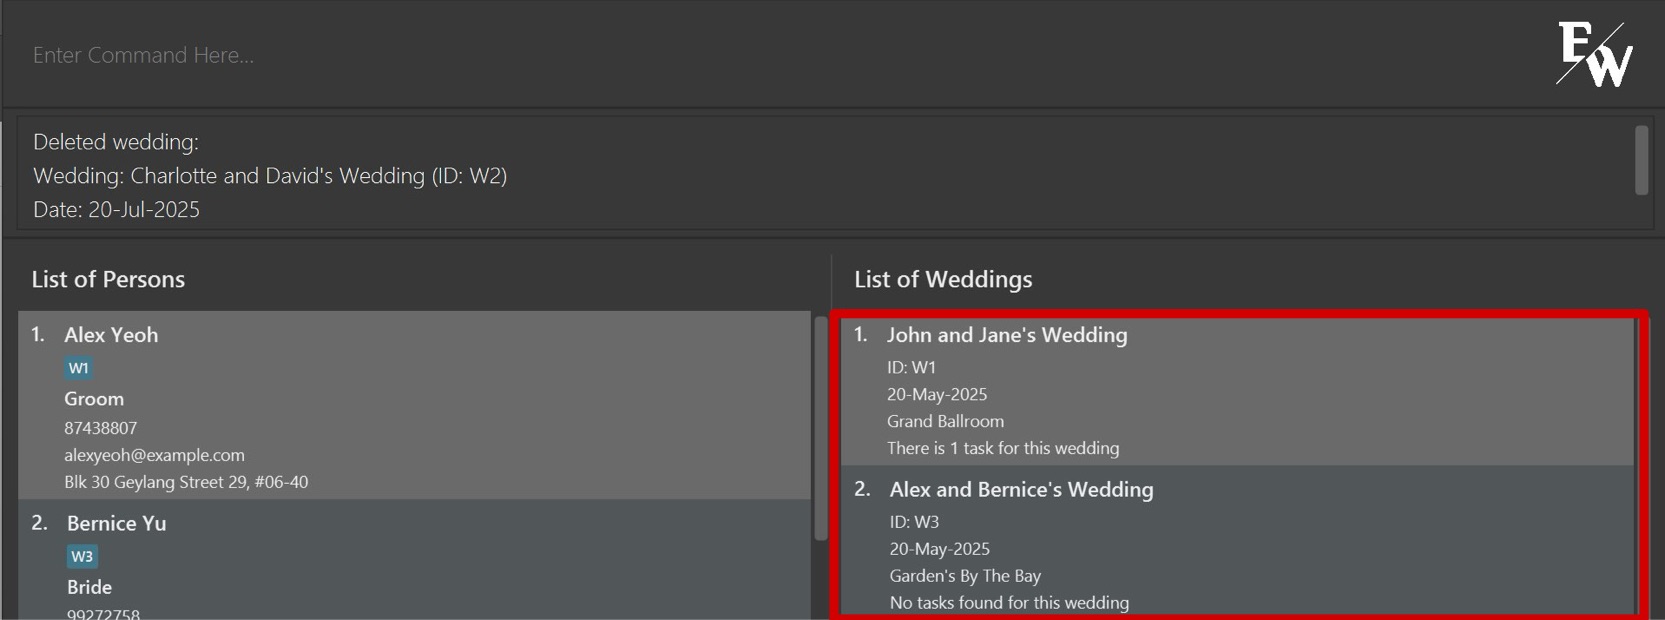
Deleting a Wedding Event: deleteWedding
Deletes the specified wedding event from the contact book.
Format: deleteWedding WEDDING_ID
- Deletes the wedding event with the specified
WEDDING_ID. - Tags of contacts associated with the deleted wedding event will be removed.
Examples:
deleteWedding W2
This command deletes the wedding event with ID W2 (Refer to the image below)
Sorting all Wedding Events by increasing Wedding ID: sortWID
Shows a list of all wedding events in the contact book sorted by increasing Wedding ID.
Format: sortWID
Sorting all Wedding Events by earliest Date: sortWDate
Shows a list of all wedding events in the contact book sorted by date, from earliest to latest.
Format: sortWDate
Managing Wedding Tasks
Adding a Wedding Task: addTask
Adds a new task to a specified wedding event.
Format: addTask w/WEDDING_ID desc/TASK_DESCRIPTION
- Adds a new task to a wedding event specified by
WEDDING_ID.
Examples:
addTask w/W1 desc/Book florist
This command adds a new task Book Florist to the wedding event W1.
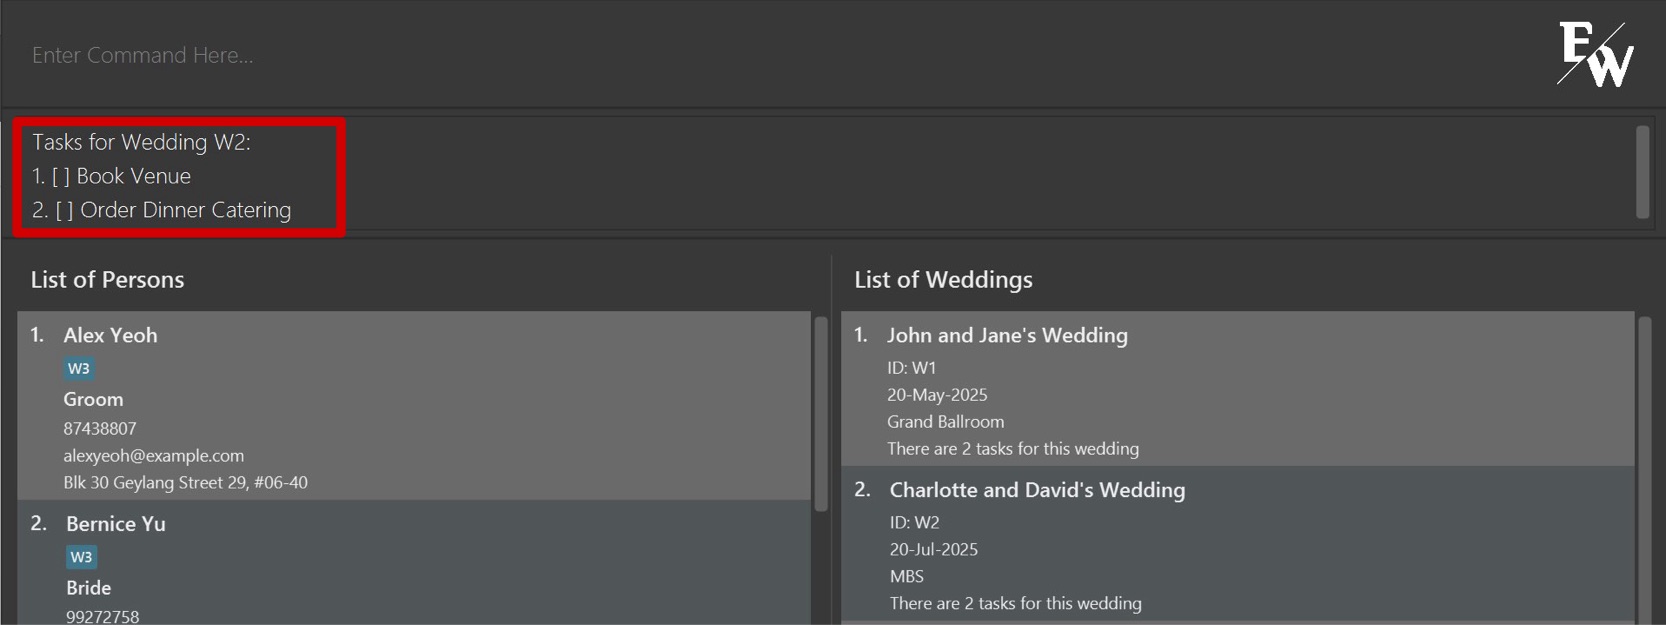
Listing all Wedding Tasks: listTask
Shows a list of all tasks of a specified wedding event in the output box.
Format: listTask w/WEDDING_ID
Examples:
listTask w/W2
This command shows a list of all tasks of the wedding event W2 (Refer to the image below)
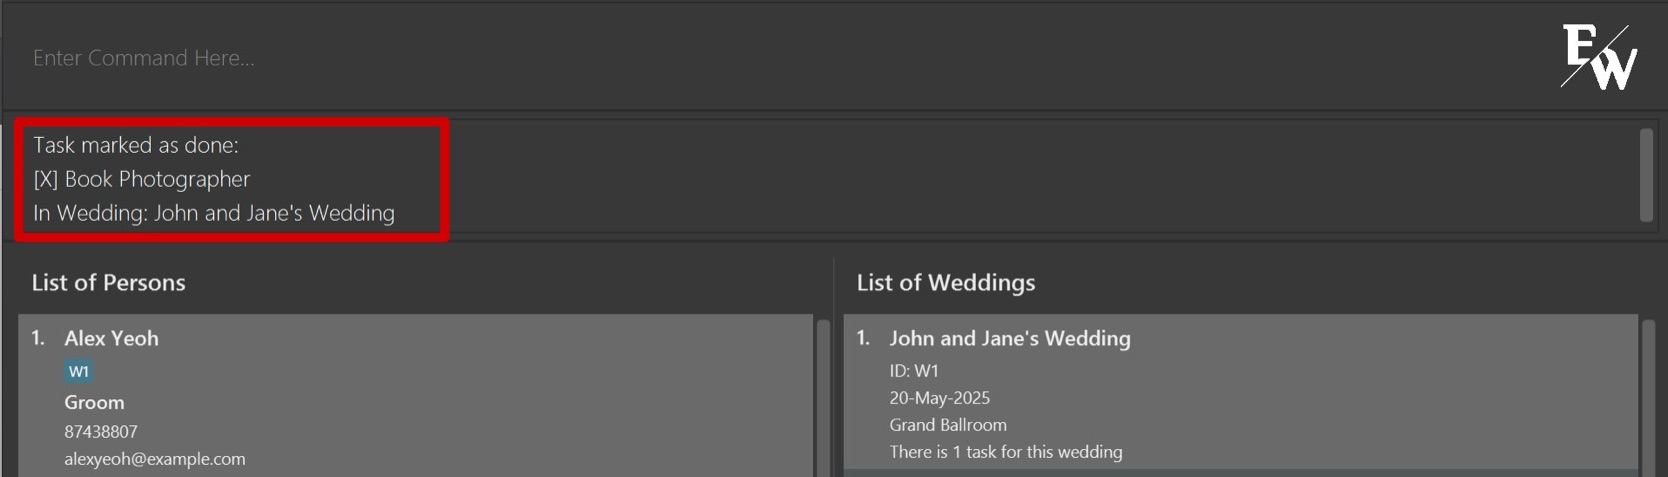
Marking a Wedding Task: mark
Marks a specified task of a specified wedding event as completed.
Format: mark w/WEDDING_ID i/TASK_INDEX
- Marks the task at the specified
INDEXfrom the wedding event specified byWEDDING_IDas completed. - The index refers to the index number shown in the displayed task list. The index must be a positive integer 1, 2, 3, …
WEDDING_IDis the unique identifier of the wedding event.
Examples:
mark w/W1 i/1
This command marks the Task at index 1 of the wedding event W1 as completed (Refer to the image below)
Unmarking a Wedding Task: unmark
Marks a specified task of a specified wedding as not completed.
Format: unmark w/WEDDING_ID i/TASK_INDEX
- Marks the task at the specified
INDEXfrom the wedding event specified byWEDDING_IDas not completed. - The index refers to the index number shown in the displayed task list. The index must be a positive integer 1, 2, 3, …
WEDDING_IDis the unique identifier of the wedding event.
Examples:
unmark w/W1 i/1
This command marks the task at index 1 of the wedding event W1 as not completed.
Deleting a Wedding Task: deleteTask
Deletes the specified task from a specified wedding event.
Format: deleteTask w/WEDDING_ID i/TASK_INDEX
- Deletes the task at the specified
INDEXfrom the wedding task list of the wedding event specified byWEDDING_ID. - The index refers to the index number shown in the displayed task list. The index must be a positive integer 1, 2, 3, …
WEDDING_IDis the unique identifier of the wedding event.
Examples:
deleteTask w/W1 i/1
This command deletes a task at index 1 from the wedding task list of the wedding event W1.
Managing Tags
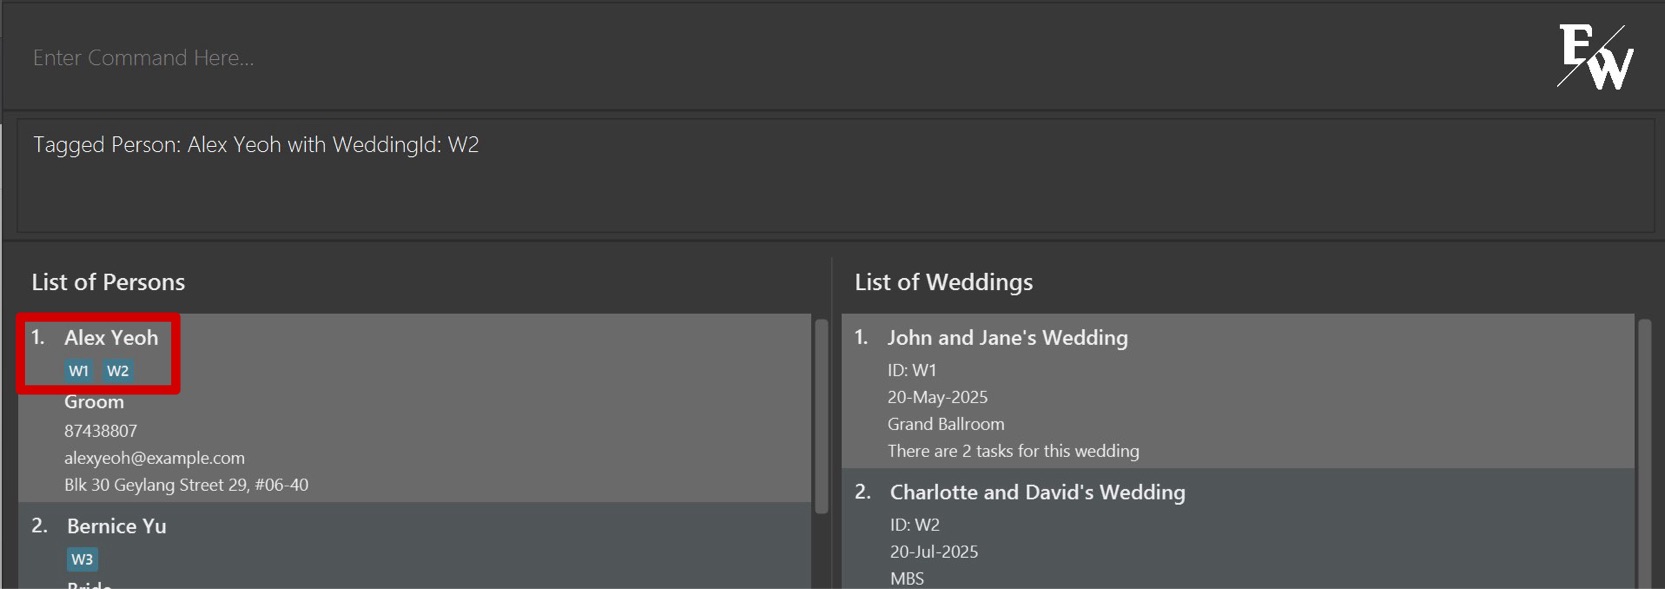
Tagging a Person to a Wedding: tag
Tags an existing contact to an existing wedding event.
Format: tag INDEX WEDDING_ID
- Tags the person at the specified
INDEXto the wedding event specified byWEDDING_ID. - The index refers to the index number shown in the displayed person list. The index must be a positive integer 1, 2, 3, …
WEDDING_IDis the unique identifier of the wedding event.- Contacts can only be tagged to wedding events that are already existing in the system.
- Each contact can be tagged to more than one wedding event.
Examples:
tag 1 W1
This command tags the first person to the wedding event W1
tag 1 W2
This command tags the first person to the wedding event W2. Now the first person will be tagged to both W1 and W2. (Refer to the image below)
Untagging a Person: untag
Untags an existing contact from an existing wedding event.
Format: untag INDEX WEDDING_ID
- Untags the person at the specified
INDEXfrom the wedding event specified byWEDDING_ID. - The index refers to the index number shown in the displayed person list. The index must be a positive integer 1, 2, 3, …
WEDDING_IDis the unique identifier of the wedding event.- Contacts can only be untagged from wedding events that are already existing in the system.
Examples:
untag 1 W1
This command untags the first person from the wedding event W1
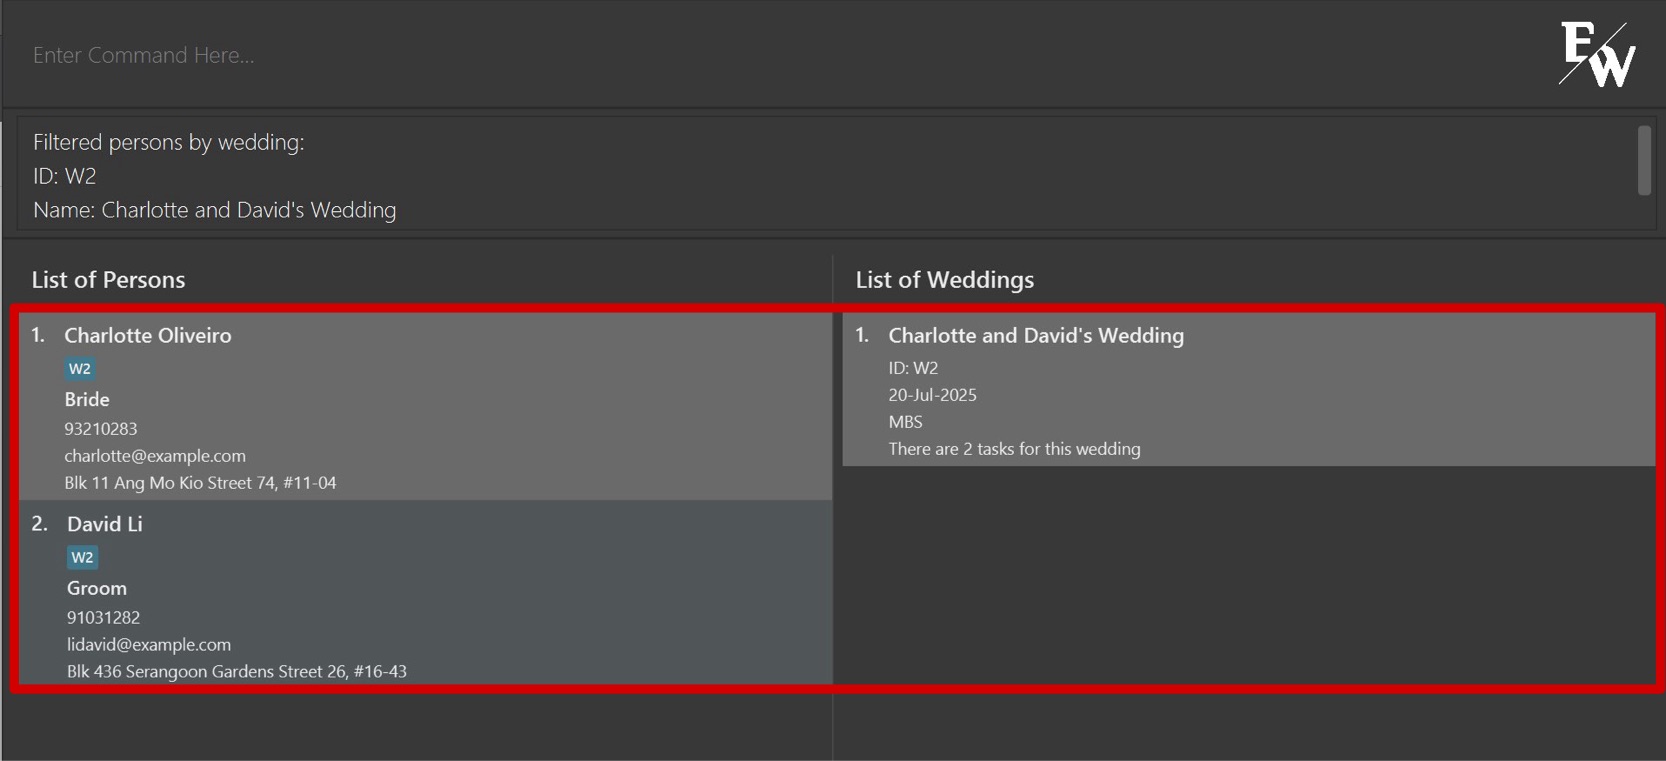
Filtering Contacts: filter
Filters contacts related to a specified wedding ID.
Format: filter WEDDING_ID
- Filters contacts that are tagged with the specified
WEDDING_ID - Wedding ID is the unique identifier of the wedding event.
- Only the wedding event corresponding to the
WEDDING_IDwill be displayed in the list of weddings.
Examples:
filter W2
This command displays the details of W2 and returns the contacts that are tagged to W2. (Refer to the image below)
Data Management
Listing all Persons and Wedding Events: list
Shows a list of all persons and weddings in the contact book.
Format: list
Tip: Remember to use list to show the full contact book again after you used find and filter.
Clearing all entries: clear
Clears all entries from the contact book.
Format: clear
Tip: In order to prevent you from accidentally clearing the contact book (which is unrecoverable), we have included a Confirmation Check similar to adding duplicates.
Saving the data
EasyWeds data are saved in the hard disk automatically after any command that changes the data. There is no need to save manually.
Editing the data file
EasyWeds data are saved automatically as a JSON file: [JAR file location]/data/addressbook.json. Advanced users are welcome to update data directly by editing that data file.
Caution:
As much as you are able to manually edit the details of contacts and wedding events, you are strongly advised against editing the weddingIDs in the data file as this will very likely cause the application to behave in unexpected ways.
If your changes to the data file make its format invalid, EasyWeds will discard all data and start with an empty data file at the next run. Hence, it is recommended to take a backup of the file before editing it.
Furthermore, certain edits can cause EasyWeds to behave in unexpected ways (e.g. if a value entered is outside the acceptable range). Therefore, edit the data file only if you are confident that you can update it correctly.
Exiting the program
Exiting the program: exit
Exits the program.
Format: exit
FAQ
"How do I know if I have Java installed or what version I have?"
- Open a terminal (for macOS/Linux) or command prompt (for Windows).
- Type in this command:
java -version - If you have Java installed, you will see a version number that looks like this: "17.0.1" (or higher).
- If you don’t have Java installed or see a version lower than 17, download the latest JDK from here.
"What is the home folder and where do I copy the file?"
- You can choose any folder to be the home folder where you want to store your EasyWeds files.
- Choose a folder location which you can find easily afterwards (e.g. Documents).
- Copy (or move) the downloaded .jar file into this folder, which will contain your EasyWeds data as you use the application.
"How do I open a command terminal and navigate to a folder?"
On Windows:
Press Win + R, type cmd, and press Enter to open the command prompt.
Use the cd command to navigate to your folder. For example, if your file is on the Desktop, type:
cd Desktop
On MacOS:
Press Command + Space, type Terminal, and press Enter.
Use the cd command to navigate to your folder. For example, if your file is on the Desktop, type:
cd ~/Desktop
On Linux:
Open your terminal (typically found in Applications > Utilities or by pressing Ctrl + Alt + T).
Use the cd command to navigate to your folder. For example, if your file is in your home directory, type:
cd ~
"Why do I get an error when I try to run the command java -jar easyweds.jar."
Ensure that you have typed in the exact name of the .jar file. If the file was renamed, use that name in the command instead:
java -jar "<name_of_file>.jar"
"How do I transfer my data to another Computer?"
Install the app on the other computer and overwrite the empty data file it creates with the file that contains the data of your previous EasyWeds home folder.
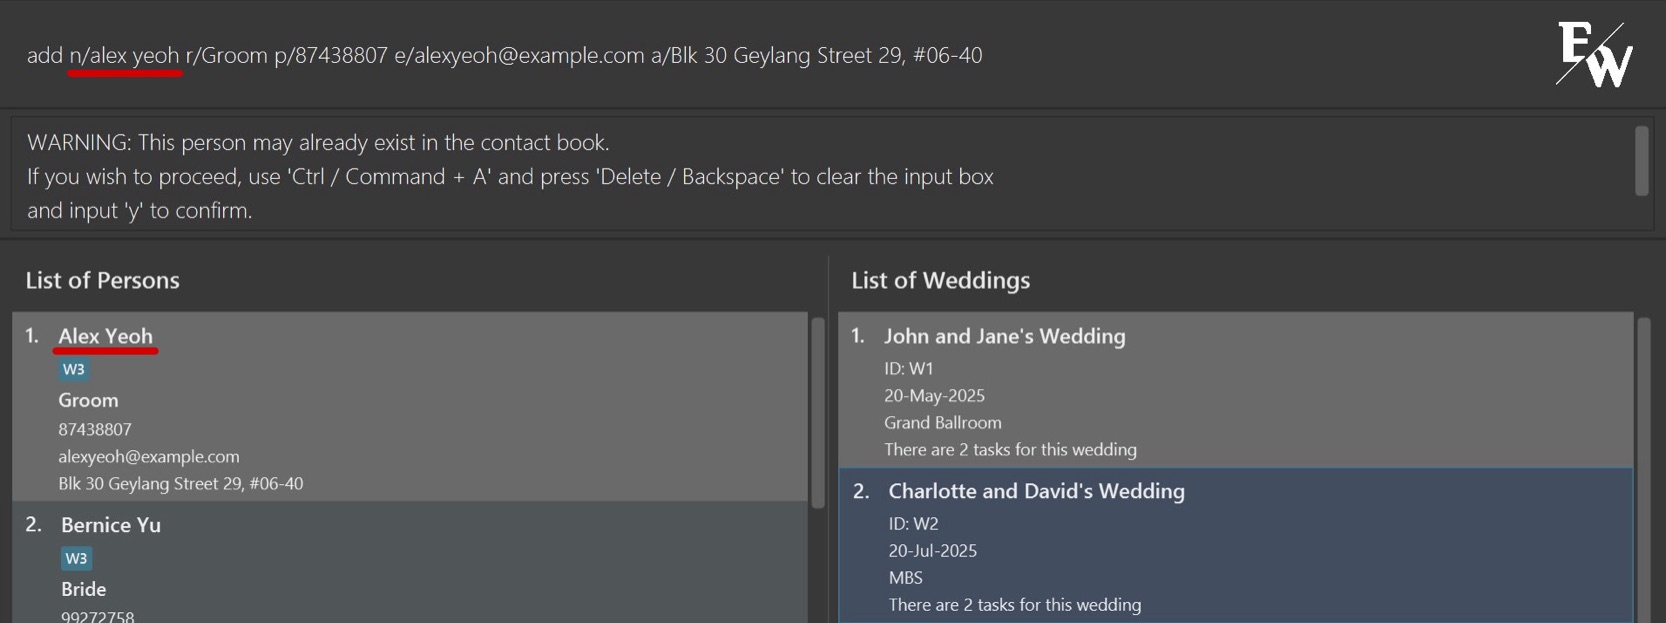
"What is considered as a duplicate name?"
- If there is a Person with the name
Alex Yeohin the contacts (Refer to the image below), the following will be flagged out:Alex Yeoh(exactly the same)alex<space>yeoh(no capitalization)Alex<space><space>Yeoh(extra spacing)Alex<space><space>yeoh(combination of the 2)
- In such a case, the potential duplicate is spotted and the User will need to confirm if he wants to add this Person or make a change to the input
"How do I make a confirmation or cancellation of my previous command?"
Once you receive the warning message, you can choose to either:
- Confirm - Use 'Ctrl / Command + A' to select the whole input text and press 'Delete / Backspace' to clear the input box. Afterwards, input the command
ywhich will add this Person into the contact list. - Cancel - Edit the current input in your input box. Once no duplicates are detected, when you press 'Enter', this Person will be added into the contact list.
Known issues
- When using multiple screens, if you move the application to a secondary screen, and later switch to using only the primary screen, the GUI will open off-screen. The remedy is to delete the
preferences.jsonfile created by the application before running the application again. - If you minimize the Help Window and then run the
helpcommand (or use theHelpmenu, or the keyboard shortcutF1) again, the original Help Window will remain minimized, and no new Help Window will appear. The remedy is to manually restore the minimized Help Window.
Command summary
| Action | Format, Examples |
|---|---|
| Add Person | add n/NAME p/PHONE_NUMBER e/EMAIL a/ADDRESS r/ROLE… e.g., add n/James Ho p/22224444 e/jamesho@example.com a/123, Clementi Rd, 1234665 r/Photographer |
| Edit Person | edit INDEX [n/NAME] [p/PHONE] [e/EMAIL] [a/ADDRESS] [r/ROLE]…e.g., edit 2 n/James Lee e/jameslee@example.com |
| Delete Person | delete INDEXe.g., delete 3 |
| Find Person | find KEYWORD [MORE_KEYWORDS] e.g., find James Jake |
| Add Wedding | addWedding n/NAME d/DATE l/LOCATION e.g., addWedding n/John and Jane's Wedding d/20-Feb-2026 l/Marina Bay Sands |
| Edit Wedding | editWedding WEDDING_ID [n/NAME] [d/DATE] [l/LOCATION] e.g., editWedding W1 d/20-Feb-2026 l/Marina Bay Sands |
| Delete Wedding | deleteWedding WEDDING_ID e.g., deleteWedding W1 |
| Sort Wedding List by Id | sortWID |
| Sort Wedding List by Date | sortWDate |
| Add Task to a Wedding | addTask w/WEDDING_ID desc/TASK_DESCRIPTION e.g., addTask w/W1 desc/Book florist |
| List Tasks of a Wedding | listTask w/WEDDING_ID e.g., listTask w/W1 |
| Mark Task as Complete | mark w/WEDDING_ID i/TASK_INDEX e.g., mark w/W1 i/1 |
| Mark Task as Incomplete | unmark w/WEDDING_ID i/TASK_INDEX e.g., unmark w/W1 i/1 |
| Delete Task in a Wedding | deleteTask w/WEDDING_ID i/TASK_INDEX e.g., deleteTask w/W1 i/1 |
| Tag Wedding to a Person | tag INDEX WEDDING_ID e.g., tag 1 W1 |
| Untag Person from a Wedding | untag INDEX WEDDING_ID e.g., untag 1 W1 |
| Filter Details of a Wedding | filter WEDDING_ID e.g., filter W4 |
| List All Contacts & Weddings | list |
| Clear All Content | clear |
| Exit EasyWeds | exit |